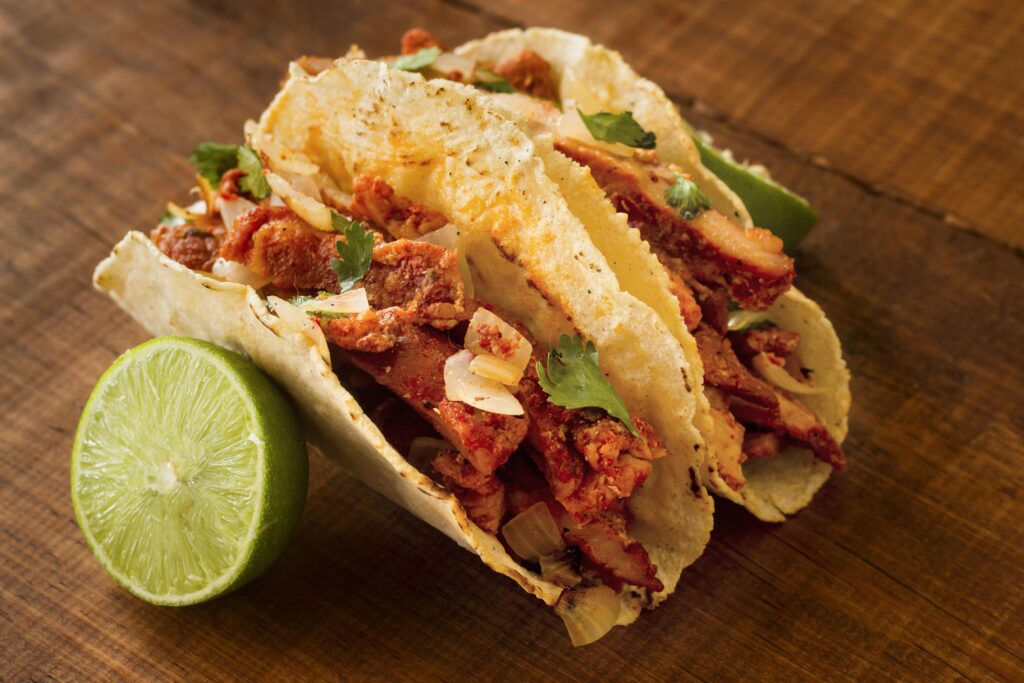
You’ve seen them everywhere. Those glorious, crimson-stained, cheese-oozing birria tacos, held aloft over a steaming cup of rich, red consommé. It’s the undisputed viral superstar of the food world, a dish so photogenic it practically broke the internet. You’ve dutifully followed the online recipes, braised the meat for hours, and dipped your tortilla in the fat. But when you take that first bite, it’s… fine. It’s a decent beef taco. It lacks the profound, layered, soul-stirring depth you were promised.
This is the great birria betrayal. The lie is that birria is just a spicy beef stew that you turn into a taco. It is not. True birria is a symphony. It’s a patient, alchemical process where dried chilies are not just an ingredient, but the very soul of the dish. The final taco—that crispy, cheesy, glorious quesabirria—is merely the final, triumphant note.
I’ve spent a lifetime chasing this flavor, from the back-alley stands in Jalisco where birria was born (traditionally with goat, not beef) to the hottest taco trucks in Los Angeles. I’ve worked in kitchens where we simmered enormous cauldrons of the stuff, and I’ve learned that the secret isn’t in a complicated list of birria tacos ingredients. It’s in the technique. It’s in understanding the personality of each chili, the importance of the braise, and the sacred role of the consommé.
Today, we’re going to stop making “spicy beef tacos” and learn how to make birria tacos with the depth and character they deserve. We’re going to deconstruct the process, fix the common failures, and build a birria so good, it will haunt your dreams in the best possible way.
The Heart of Darkness: The Chili Marinade is Everything
This is where the magic begins and where most home cooks stumble. The adobo, or chili marinade, is not just for color and spice. It is the entire flavor foundation of the dish. Rushing this step or using the wrong chilies is like trying to build a house on a foundation of sand.
Your Chili Trinity: The Non-Negotiable Blend
You cannot make great birria with just one type of chili powder. You need a blend of whole, dried chilies, each playing a specific role.
| Dried Chili | The Role It Plays | Flavor Profile & Pro-Tips |
|---|---|---|
| Ancho Chilies | The Body & Sweetness. | This is your workhorse. It’s a dried poblano pepper. It has a deep, raisin-like sweetness, mild heat, and provides the dark, rich color and body of the adobo. Use the most of this one. |
| Guajillo Chilies | The Brightness & Acidity. | This chili brings a vibrant red color and a bright, tangy, almost berry-like flavor with a medium heat. It cuts through the richness and keeps the adobo from tasting heavy or muddy. |
| Chiles de Árbol | The Fire. | These are small, slender, and potent. This is where your assertive heat comes from. Use them sparingly at first; you can always add more heat later. They have a clean, sharp, fiery kick. |
A personal story: I once watched a young cook try to make a “quick” birria using only chili powder. The chef, a stoic man from Guadalajara, tasted it, shook his head, and said, “You have made a painting with only one color. It is flat. Birria needs light and shadow.” The blend of chilies provides that light and shadow.
Step 1: The Rehydration Ritual
- Toast the Chilies: On a dry skillet (a comal is traditional) over medium heat, toast your whole, dried chilies for 30-60 seconds per side. You are not trying to char them; you are “waking up” their essential oils. They will become fragrant and slightly pliable. Do not let them burn, or they will become bitter.
- Soak and Soften: Remove the stems and most of the seeds from the toasted chilies. Place them in a bowl and cover them with very hot (not boiling) water or beef broth. Use a small plate to keep them submerged. Let them soak for at least 30 minutes, until they are completely soft and supple.
Step 2: Building the Adobo
- The Blend: Transfer the softened chilies and about a cup of their soaking liquid to a high-powered blender.
- The Aromatics & Spices: This is where you build the next layer of complexity. Add the following to the blender:
- ½ white onion, roughly chopped
- 6-8 cloves of garlic
- 1-2 Roma tomatoes, roughly chopped (for a touch of fruity acidity)
- The Spice Cluster (The Pro Move): In the same dry skillet you used for the chilies, toast these whole spices for 60 seconds until fragrant: 1 teaspoon cumin seeds, 1 teaspoon whole black peppercorns, ½ teaspoon whole cloves, and a small piece of a Mexican cinnamon stick (canela). Toasting them whole unlocks a depth of flavor that pre-ground spices simply cannot match. Add these to the blender.
- 2 tablespoons of apple cider vinegar (for brightness and to tenderize the meat).
- A generous pinch of Mexican oregano.
- The Emulsion: Blend on high for several minutes, until the mixture is completely and utterly smooth. If it’s too thick, add a little more of the chili soaking liquid.
- The Strain (A Non-Negotiable Step): Pour the blended adobo through a fine-mesh sieve into a bowl, using the back of a spoon to press all the liquid through. You will be left with a fibrous pulp of chili skins and seeds. Discard this pulp. This step is the difference between a gritty, rustic sauce and a silky, restaurant-quality consommé.
You now have a perfect, smooth, intensely flavorful adobo. This is the heart of your birria.
The Meat: Choosing Your Champion
While traditional birria from Jalisco is made with goat (chivo), the beef birria that has become an international sensation is a testament to the power of the right cut. Do not use a lean roast. You need fat and collagen.
- The Gold Standard: A combination of beef chuck roast and bone-in beef short ribs. The chuck provides the meaty, shreddable texture, while the short ribs contribute an incredible, unctuous richness and a deep beefy flavor from the bone and collagen.
- A Great Alternative: A mix of chuck roast and beef shank. The shank is full of connective tissue that breaks down into luscious gelatin.
- The Meat Prep: Cut the chuck roast into large, 3-4 inch chunks. Leave the short ribs whole. Season all the meat generously with kosher salt and black pepper.
The Braise: The Slow Magic of Transformation
This is a patient process. You cannot rush it. You have two main paths here:
Step 3: The Cook
- The Sear: In a large, heavy-bottomed Dutch oven, heat a little oil over high heat. Sear the beef chunks and short ribs in batches until they have a deep brown crust on all sides. Do not crowd the pan. This browning (the Maillard reaction) builds another critical layer of flavor. Remove the seared meat and set it aside.
- The Marriage: Pour your strained adobo into the hot pot and cook for 2-3 minutes, stirring constantly, until it darkens slightly and becomes fragrant. This is called “frying the sauce.”
- The Simmer: Return the seared meat to the pot, along with any accumulated juices. Add 2-3 bay leaves. Add enough beef broth to almost cover the meat. Bring it to a boil, then reduce the heat to the absolute lowest setting.
- The Long Wait: Cover the pot and let it simmer gently for at least 3-4 hours on the stovetop, or place it in a 325°F oven. You will know it’s ready when the meat is fall-apart tender. You should be able to shred it easily with a fork. It should offer no resistance.
- Pressure Cooker Method: For a faster birria tacos recipe easy on time, you can use an Instant Pot or pressure cooker. Sear the meat using the sauté function, then add the adobo and broth. Cook on high pressure for 60-75 minutes, then allow for a natural pressure release. The flavor will be excellent, though a slow simmer often yields a slightly deeper complexity.
The Consommé: The Sacred Broth
Once the meat is cooked, the magic isn’t over. You now have two precious components: the tender meat and the braising liquid.
Step 4: Separating and Seasoning
- Carefully remove the meat from the pot and transfer it to a large bowl. Let it cool slightly, then shred it with two forks, discarding any large pieces of fat or bone.
- The Consommé: Strain the braising liquid through a fine-mesh sieve into a separate saucepan. This is your consommé. You will notice a thick layer of brilliant red fat rise to the top. This is liquid gold. Do not discard it. This fat is the key to the final taco.
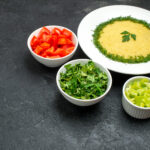
- Season the Consommé: Taste the consommé. It will likely need salt. Season it well. Keep it warm on the stove. You can also stir in a little bit of finely chopped cilantro and white onion for freshness.
The Final Act: Assembling the Perfect Quesabirria Taco
Now, we bring it all together in a symphony of crisp, cheese, and meat.
- The Dip: Take a corn tortilla and dip it entirely into the consommé, specifically skimming it through that top layer of red fat. The tortilla should be stained red and pliable.
- The Griddle: Place the fat-dipped tortilla on a hot griddle or cast-iron skillet over medium heat.
- The Cheese: Sprinkle a generous amount of shredded Oaxacan cheese or a low-moisture, whole-milk mozzarella onto one half of the tortilla. The best type of cheese for quesatacos is a good melting cheese that will give you that epic “cheese pull.”
- The Meat: Add a portion of the shredded birria meat on top of the cheese.
- The Fold and Fry: Fold the other half of the tortilla over the filling. Press down gently with a spatula. Let it fry for 2-3 minutes per side, until the cheese is completely melted and the outside of the tortilla is browned and crispy. The fat from the consommé will “fry” the tortilla, creating an unbelievably flavorful and crisp exterior.
- Serve Immediately: Serve the hot, crispy quesabirria tacos with a small cup of the warm consommé for dipping, a lime wedge, and a side of finely chopped cilantro and onion.
Pro-Level Troubleshooting & Variations
- How to fix watery consommé? If your consommé feels thin, simply simmer it gently on the stove to reduce it and concentrate its flavors.
- Preventing tortillas from breaking: If your tortillas are breaking when you dip them, they might be too old or you’re soaking them for too long. A quick, confident dip is all you need. You can also quickly warm the tortillas on the griddle before dipping to make them more pliable.
- Chicken Birria Tacos: A great, lighter alternative. Use bone-in, skin-on chicken thighs. The process is the same, but the cooking time will be much shorter (about 1-1.5 hours).
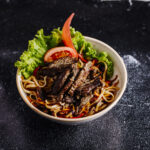
- Birria Ramen: This is an incredible fusion dish. Simply prepare your favorite ramen noodles and serve them in a bowl of the hot, flavorful consommé, topped with the shredded birria meat, a jammy egg, and fresh garnishes.